Dyeing is a very exciting journey.
You can transform colours. You are the artist.
My first was the shibori project involving my UNIQLO dress, and I also had a taste of dyeing with batik colours, transforming a well-loved white top into a myriad of colours. These upcycling projects used less natural chemicals, but they still enabled me to make my clothes last longer!
I had put aside my "zombie apocalypse" top that I had upcycled using an old white organic MUJI top and the ecoprint method. Local cherries and onions were wrapped inside the organic cotton and bundled off into the steamer. I had high expectations, but what you initially see when you bundle the garment, is not what you get after the steaming. I had forgotten that:
Eco Prints and Natural Dye
I have been experimenting with combining upcycling, ecoprinting and dyeing.I had put aside my "zombie apocalypse" top that I had upcycled using an old white organic MUJI top and the ecoprint method. Local cherries and onions were wrapped inside the organic cotton and bundled off into the steamer. I had high expectations, but what you initially see when you bundle the garment, is not what you get after the steaming. I had forgotten that:
a) plant / vegetable colours become "sadder" after the garment is cured. The brilliance of the cherry red faded to a mere pink. I felt a little cheated but I think I it was because I just hadn't done my homework.
b) less is more. As you can see in the video below, I had gone overboard. Encouraged by what I had seen in youtube videos, I decided to copy the tutorials. Unfortunately, I didn't get what I wanted, but you learn from your mistakes.
So this is what the garment looked like immediately after the unrolling - notice the hues of green and deep reds? Well these all faded into a bloody orange and red, while the green just disappeared (see right of the picture). I honestly thought that the colours were fine, and I quite liked the look until someone mentioned it looked like blood. It didn't help that I was having my period at the same time too! Can you imagine what I saw when I was changing my soiled flannel?
To be honest, I am not too sure why the green disappeared - I had read that the kumquat leaves would impart a deep green to cotton. Either I hadn't done the eco printing correctly, or I had acquired the wrong type of leaves.
Needless to say, the overwhelming majority of my friends said, "zombie apocalypse" and "crime scene". Many suggested that I try doing some stitching on the top to give it dimension but I did feel that the red from the onion and cherry was very overwhelming and any amount of stitching wouldn't be able to save the garment.
Rust Dye
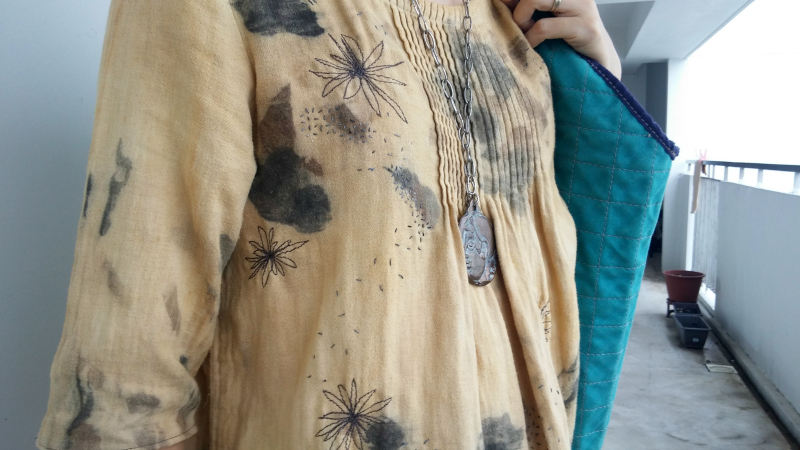
It took me a while to figure out what to do. I put the garment to one side and was deciding between redyeing or stitching. I decided to do both. The first step was to immerse it into the rust solution (basically an iron mordant that you can make with vinegar, water and rusty nails). It was very scary at first as rust can eat away at the fibers and basically destroy the garment. So, it was a case of a quick dip, in and out, then drying and repeating it a second time before rinsing and immersing in salt solution to make the colours last. The result of this process was shades of grey and brown.
The onions became a very dark grey, while the cherries gave a dark reddish brown.
Stitching the Garment
After dyeing and curing the garment, it was onto the stitching. I was inspired by dandelions and the seed dispersal during spring. So it was back the sewing machine for some free motion embroidery with dark brown #30 Gutterman thread. I ended off with some handstitching using a variegated #12 Aurifil thread for the seed dispersal.
Patience
This garment upcycle took longer than my usual projects. In fact, I have noticed that my projects are taking quite a bit of time compared with my sewing from a few years ago. It was disheartening but I have observed that I am at a very peaceful stage with my work - I can't panic, I need to be calm. It was very reassuring when I read this article in the BBC Art website detailing the work that goes into making a traditional Japanese kimono. It takes one year, and one of the weavers, Mifuko Iwasaki says:
"Calmness is important. If we mess it up now all the work until this point will be for nothing ..... If you’re not in a peaceful state of mind it will show in your work." Mifuko Iwasaki
How important these words are to me! Take time to do your work, don't rush, and even better, be calm.


Wow the finished product is stunning! Nice job!
ReplyDeletehttp://www.mylittlenest.org
I love how you've added both hand and machine stitching to the dyeing, Agy - very effective.
ReplyDeleteI liked the red! But yes, I can see how it looked a little...startling? Great rescue job!
ReplyDelete