-->
no
no
Showing posts with label natural. Show all posts

How to upcycle your scrap fabric

No comments
How to upcycle your scrap fabric
Ever since I started sewing, my pile of fabric scraps has grown beyond belief. There are tiny pieces the size of my hand and there are others that are double that size but not big enough to sew anything decent. So this scrap pile has just been sitting there looking bored, and when I look at it I think, "what shall I sew with them?", or "what shall I upcycle them into?".  The last time I touched the scrap pile was when I made my kintsugi inspired pair of trousers. Gosh, I love this pair not because it's colourful and unique, but because I spent so much time making it - it was a labour of love! I think it must have taken me about a month to upcycle all those scraps and transform my husband's denim shirt. 

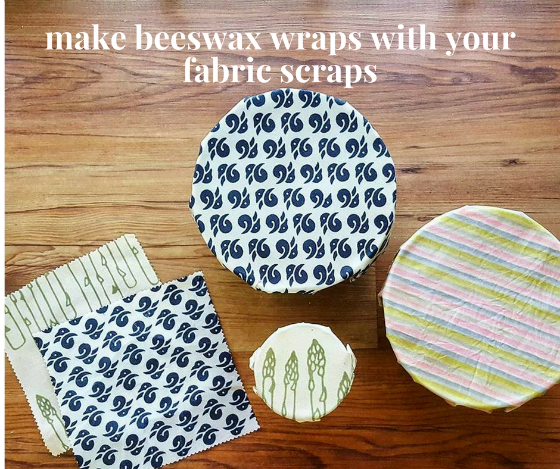
So, what do I upcycle my scraps into? I found this great site, but I was sure there is something that does not involve needle and thread. I decided why not make them into beeswax wraps. They have been all the rage lately, especially with the zero waste community. They are fabric swatches soaked in beeswax, dried and then used to replace plastic cling wrap and aluminium foil. I was hesitant about using them, but after a while I decided to take the plunge.  The first batch I made was with Olivia of The  Tender Gardener.  We melted all the ingredients in a bainmarie and carefully spread the mixture onto the fabric using a brush. 

Olivia explained that it was important to use certified organic beeswax as the wrap would be used with food.  She also added that it was important to prevent the wax from cracking on the fabric and therefore oils such as coconut oil or jojoba should be added. Don't you think they look pretty?

DIY Beeswax Wrap using Fabric Scraps

Olivia and I were very pleased and excited with the results that we decided to conduct a workshop last month. All the ladies were definitely happy with their own wraps. 

DIY Beeswax Wrap Workshop

You can definitely try this at home as we have developed our own DIY Beeswax Wrap Kit in time for Christmas. Each kit costs $49 and includes cerified organic beeswax, certified organic jojoba oil, natural pine rosin, 6 cloths measuring 7"x7" and 9"x9", and a brush. What you will need at home is a heat source (a sauce pan will do), a small glass container (an old jam jar is good), grease proof paper (available at all supermarkets) and an iron. 


DIY Beeswax Wrap Kit


Natural Dyes : Common Misconceptions

5 comments
Natural Dyes : Common Misconceptions
Ladies and gentlemen, I have finished my art residency at L'Observartoire.

Yes, one month is over and I can't believe how fast it went. The open studio was very successful and the dyed and upcycled pieces sparked conversations about nature, sustainable fashion and food waste. I would like to thank Isabelle Desjeux and Blue House International School for giving me the wonderful opportunity to carry out my experiments at the studio. They were such a supportive and welcoming group. Special thanks also goes to the Pantry at the school, the educators, the parents and children, Kitchen by  Food Rebel and Native Bar for supplying the much needed food scraps. Thank you. Thank you also to Muriel Boutin-Becuwe for helping to source for the hotel bedsheets that would have otherwise been sent to the landfill.


Having started the dyeing in January 2017, the journey does not end here (although I think I would like to take a rest!). There are so many things I would like to do, but there also so many things that I learnt and would like to share here. The first is to quell the misconceptions that I hear about natural dyeing.

Common Misconceptions about Natural Dyes


Common Misconceptions About Natural Dyes

a) Natural dyes have no environmental impact

We often get misled by the word "natural". Although the dyes come from nature, it doesn't mean that the process of extracting them and applying them to the fabric has no environmental impact. For one piece of fabric (60cm x 60cm),  I had to:

 - scour it to get rid of oils, wax and dust
 - mordant it and then rinse
 - make a dye pot and dye the fabric before giving it a final rinse.

Throughout this process, I had to heat my pot for over 3 hours and use copious amounts of water. Just imagine this going on in a factory! So who says there is no environmental impact?

b) There are no chemicals in natural dyes

What is a chemical? A chemical is any substance that contains matter be it naturally or synthetically made.  Natural dyes contain chemicals - mangifera indica is the chemical from mango leaves that produces the yellow green colour, while the dye in onion skins is 3,5,7,4 - tetrahydroxyantocyanidol or Pelargonidin.  In fact, water and even sugar is a chemical, large amounts of which would be toxic to us.

Chemicals are used to help the dyes adhere to the fibers of a piece of fabric - alum, iron sulphate, copper sulphate, tin and chrome have all been used in the dyeing process. Without them the colours would not be light or colour fast. However, due to environmental and safety reasons, copper, tin and chrome are no longer used.

Dragon Fruit Dye

c) Vinegar and salt are mordants

During the open studio, many people asked me whether I used vinegar or salt as mordants. The answer is no because they are not mordants. Rather, vinegar is used to shift the pH of the dye pot and this is how you achieve different shades of natural dye colour from one source.  Vinegar is also used when applying synthetic dyes so that there is an even take up of dye.

Salt on the other hand is linked to fixing the colours of synthetic dyes such as Dylon.  If you would like to make rust dye then vinegar and salt are your best friends!


d) Natural dyes are dull

While the majority of natural dyes (based on my experiments in Singapore for the past year) end to give brown, at this residency I have been able to extract bright yellow, pinks and orange.  The dullness may occur over time if no mordant is used or if an iron mordant is used - iron sulphate tends to give a "sadder" version of a colour.

Over-boiling a dye pot could create a colour duller than expected. My favourite dye is the yellow green from mango leaves. However, dyeing it for over an hour tends to change the colour to brown.


Colours that I have achieved:
  1. Mango leaves, Mangifera indica. L. - yellow green
  2. Rukum masam, Flacourtia inermis Roxb - muted pink
  3. Eucalyptus leaves (immersive and eco print) and bark, Eucalyptus camaldulensis Dehnh - rich brown
  4. Golden shower tree pods, Cassia fistula - pale brown
  5. Yellow onion skins - deep orange
  6. Red onion skins - pale orange
  7. Coffee grounds - very pale brown
  8. Avocado seeds and skins - tones of pink
  9. Blue pea flower, clitoria ternatea - blue
  10. Dragon fruit - pale pink
I'm definitely looking forward to adding more to this list....

Follow my blog with Bloglovin

Hand Foot and Mouth Disease

3 comments
Warning: This is a really long post about our experience with HFMD and what we did to prevent it from spreading to our other family members. Your symptoms may differ slightly from ours as there are different virus strains. Want to say a big thank you to my friends and my fellow mummy bloggers at Singapore Mom Bloggers for their advice!

This past week has been rather tiring because my little one and I caught Hand Foot and Mouth Disease.  I don't know where and when we caught it but I had always assumed that it was an infant / toddler illness.  My son and I are definitely not in any of these categories!  It happened so suddenly:

Blisters - only 1 - 2mm in diameter. Big one with
small ones surrounding it.
They may look small but they itched
like crazy on my son. Didn't want to show the
throat picture - it's too scarey.

Henna

No comments
Well, I'm still in search of a natural hair solution.  I've tried the baking soda and vinegar.  After awhile my hair gets brittle, and even the organic/natural shampoos only work for a while and then my oily scalp comes back.


Soak a Pu'er teabag in 9 oz of boiling water and seep for 30 mins 
Update: I added the 1tsp coffee granules to the Pu'er
Take 100 g of henna powder and add the Pu'er to it (sans tea bag!)

Mix in juice of half a lemon

Add 1 tsp of coffee granules (not the ones from the 3-in-1 mixes!) and 1 egg.
Update: Oops! Sorry, actually, I added the 1 tsp coffee granules to the Pu'er tea.


After mixing you shld get this gooey and smelly mud-like mixture.  Then let it sit for at least 3 hours for the ingredients to react with one another.  I just put mine in the fridge.  I have shoulder length hair and it gave me up to 3 applications.

Then when it's done, here's what you do with your hair:
a) wash your hair to get rid of any residue
b) let your hair dry for a while so that it's slightly damp and not dripping with water
c) remember to wear an old T-shirt or have an old towel draped over your shoulders. Oh, and wear gloves as well. 
d) massage in lots of the henna mixture into your hair (don't go over your hair line!) and then put everything under a hair cap.  Add another towel if you want to try and "steam" it.
e) Leave in hair for 3 hours (at least!)
f) Wash out thoroughly!!

OK, my hair's black, so the result I got was shiney and easily manageable black hair with hints of dark brown in the sunlight.  I'm not really sure what would happen to other hair colours but it would be good to test it out on a few strands first!   Although the smell was unbearable during the application, my hair ended up smelling okay after washing out everything. :-)

DIY: Non Toxic Litmus (Magic Ink) Painting

No comments

I've been hunting for some non-toxic paints for my son (now 4 years old!) and the only brands that I have confidence in are the European and Japanese ones. The rest... sigh.. well, you know! I ended up getting a European set of poster paints from Popular for less than S$10.


Have been searching around for really non-toxic paints, and this is what I came across! Do you remember using litmus paper in your Chemistry or Biology classes in school? The stuff that changes colour when you add it to alkali or acid? Well, Leslie at Oko box blog has a recipe for making your own litmus paper from red cabbage and when you paint it with natural paints (ie. lemons, vinegar, baking soda). It's a bit like the magic ink/paper you see sold for ridiculous prices at the bookstores.
Can't wait to try this with the little one, and it's a great project for them too! You can eat the cabbage too! Only thing is I haven't seen any red cabbage being sold at NTUC Fairprice... anyone know where I can get it?

Photo from Oko box blog.
no
no