You fall in love with it, toss it into one corner and then suddenly you fall back in love with it again. I'm describing this feeling that I have with my "snowflake" dress that was upcycled with red snowflakes in 2011. Every year, I go through my clothes and see which ones need a bit more sewing to it. It feels like an audit - they wouldn't be called clothes if they just lying in your wardrobe unworn. This denim dress is really nice. I love the cutting and the way it fits me but it really needed a bit more colour especially since it looks worn out.
Use Only What You Have!
After my last post on stitching with intent, I made sure to remind myself the importance of slow stitching. But I also reminded the importance of limitations - I would not purchase new threads for the project. I have a tendency to forget what's currently in my sewing box and gleefully go off on a haberdashery sewing spree. I was fortunate to have some DMC embroidery thread leftover from a project with the Art Science Museum, and decided to do some darning over the snowflakes.
I managed to finish it in 2 weeks and wear it at yesterday's Repair Sewcial session at The Fashion Pulpit. I asked one of my participants what the hardest part of the repair session was. It wasn't the darning, it was in fact the zipper. Sewing in a new zipper isn't easy if you don't have a sewing machine. But with patience you will get there (just like everything else in this busy world of ours).
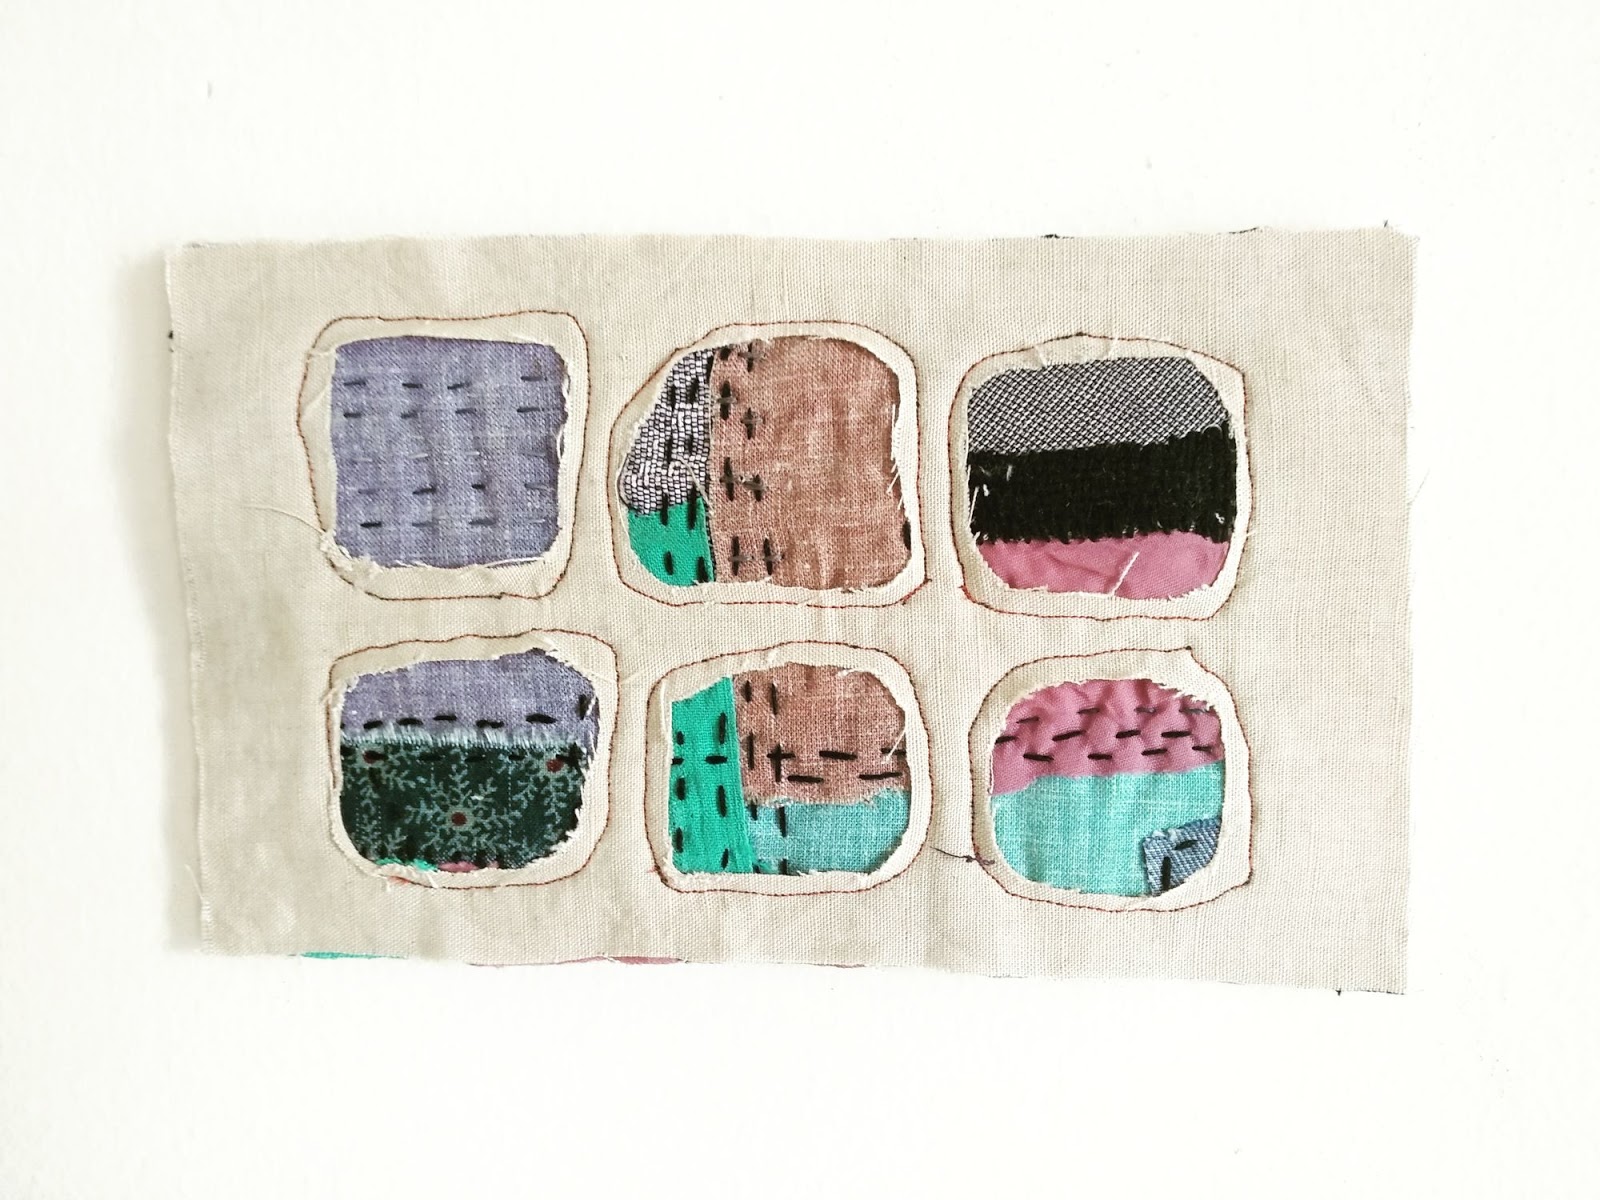
It took me a while but I am so glad that I didn't rush through the sewing for the postcards. I am so pleased with the results. Please read the descriptions of each piece and I hope you can see where the inspiration came from. Find out more about the process of making them in this post.
These postcards will be on display at Pameran Poskad from 15 - 24 July at ION Art Gallery, ION Orchard, Singapore.
Postcard 1/10 Mending - Superficial 1 Price - SG$48 SOLD On the surface everything looks great, but peel back the layers and you will find the journey of pain and healing. Textile waste Naturally dyed with eucalyptus leaves
Postcard 2/10 Mending - Superficial 2
Price - SG$48 SOLD Sometimes mending just covers things up. Are we really finding a solution? Textile waste, free motion embroidery Naturally dyed with eucalyptus leaves.
Postcard 3/10 Mending - Painful Memories 1 Price - SG$78 The world is full of anguish and despair. We desperately try to fix it but it creates one problem after another. In doing so, we create painful memories. Textile waste, free motion embroidery, handstitching, Natural dyes with avocado, eucalyptus leaves
Postcard 4/10 Mending - Painful Memories 2 Price - SG$78 I took inspiration for this from the patches used to repair clothes or quilts. Sometimes the mending only covers the bad and isn't the solution, hence the warped stitching and patches in this piece. Textile waste, free motion embroidery, handstitching.
Postcard 5/10 Mending the Mind Price - SG$88 The mind is so complex that it is difficult to pin point a remedy to alleviate the emotional turmoil a person could be going through. It could run deeper than we think, and no quick fix will be able to pull the person through all the mind's layers and into the light. Textile waste, free motion embroidery, handstitching
Postcard 6/10 Mending Relationships Price - SG$58 SOLD The relationships between you and your friends changes over time. Sometimes it's good, but other times it just disintegrates. How do we reestablish these broken connections? May be it takes mending what's on the inside first before offering your friendship again. Textile waste, free motion embroidery, handstitching Natural dyes - eucalyptus leaves
Postcard 7/10 Mend Nature or Fix Ourselves
Price - SG$68
Nature has its own way of resetting itself, so we shouldn't be mending nature but rather changing the way we behave towards it. It could be consuming less or going vegan. Every action counts!
Textile waste, free motion and hand embroidery,
Natural dyes with eucalyptus bark and leaves
Botanical printing - rambutan leaf
Postcard 8/10 Mending - Blinded
Price - SG$58 Are we blinded by our own experiences? Sometimes what we believe to be the solution is just something that restricts us from seeing the bigger picture. This is a reversible postcard. Textile waste, Free motion embroidery Natural dye with mango leaves
Postcard 9/10 Mending - Beauty in the Broken 1 Price - SG$58 Part of my slowing down journey involves embracing imperfections - I try to remind myself, don't sweat the small stuff! Textile waste Naturally dyed - mango leaves and avocado Free motion embroidery
Postcard 10/10 Mending - Beauty in the Broken 2 Price - SG$58 Embracing imperfections in life. Textile waste Naturally dyed mango leaf, avocado and tumeric Free motion embroidery
Have you heard of Pameran Poskard? I was aware of this art exhibition of postcards but I didn't realise that anyone could take part. This year, my friends encouraged me to participate and pointed out that the works did not have to be on paper (as a conventional postcard would be). So, last month I got started and created my textile art postcards based on my favourite theme of mending.
Sketchbook illustrations
But this time, it was an interpretation of mending - what does it mean, what are the different types of mending and how can it be used, how does it affect us as a society? I took my sketchbook out and started scribbling words that came to mind, and sketched different interpretations of mending. It's a very fulfilling part of the journey to creating art. Even though you may not use all your ideas for the project, it's very useful to go back to the sketchbook in the future to reflect and improve on the ideas. I find that an illustration / sample that I had done would find itself useful a few months or even years later!
My Interpretations of Mending
My initial thoughts when thinking of mending were darning, weaving, fix, stitch, weld, kintsugi and fabric (amongst others). I suppose these are related to what I have been advocating - taking good care of possessions and making them last longer through mending.
I dived deeper - when does other types of mending occur, what is the result? Words that came to mind were protection, safety, scars of abuse / violence/ tragedy / instability, superficial solutions/ mending etc. I then transformed these words into illustrations.
Interpreting Them into Stitch
It took me a while to interpret the illustrations into stitch, but I got there!
I did not use any new materials (except for the thread) in the project.
Since this project is about mending, I wanted to stay true to the meaning behind it and use whatever materials I had in the home.
One of my son's favourite shorts got torn when he was out in the playground playing parkour. When your kid reaches a certain age they become very brave and try out the impossible on the climbing frames. Well, this time he ended up with tears up and down the inner leg of his shorts and came back saying, "It happens, mom!" At least he asked whether it could be fixed instead of throwing them away. I quickly got out my embroidery thread, hoop and needle and darned away.
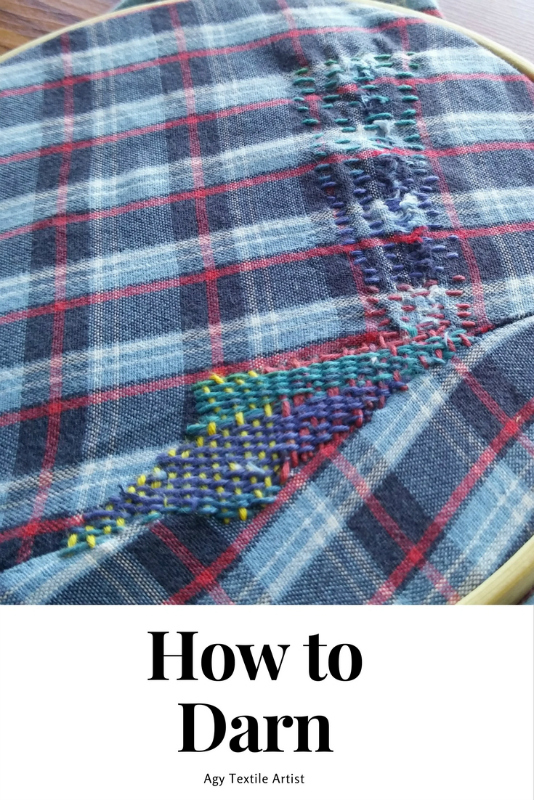
How to Darn
There have been a few comments on my video asking me where I learnt this technique and why it doesn't look like the darning they have seen. So here are my pointers:
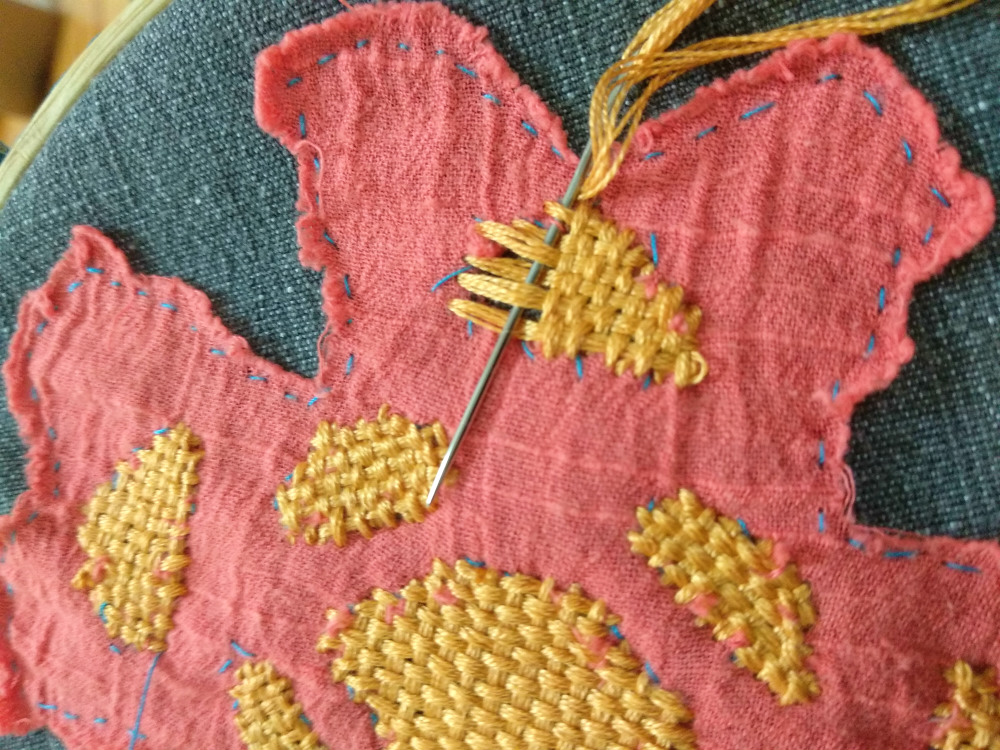
a) I learnt it from my grandma. She didn't darn socks but she did patch up her cloth bags and clothes with this method. She established warp threads across the tear and then wove a tight weave across the warp (under and over alternate threads) until she covered the entire opening.
b) I used multi-coloured embroidery thread which is why you can see bits of yellow, red and blue in the thread. I think it adds character to the mend and gives it a Japanese boro look to the shorts.
c) The embroidery hoop stabilises the fabric while you do the darning. If you are darning socks then you don't need the hoop but the darning egg.
Sharing Mending Techniques
After sharing this technique (see here), I was overwhelmed by the response and the many people who came forward to share their repairs and the memories it brought back for them. I was excited to see how so many people had come in touch with mending in some form or another whether it be through their grandparents, parents or even as a reminder for them to get mending. Two comments stood out. One came from reader, Robert (yes, a guy), and he said,
"Watching my Grandmother darn was fascinating to watch. The process is involved, but like stated it is beautiful. Like my grandmother, using different colors. I miss those days now, so this is great video. So yes darn it! Darn often and regularly. My Grandmother when helping my dad, as he was a single parent. Darn new pants in the knees, I was notorious for how quick I could wear out a set of Levi's after darning, my pants lasted until I grew out of them. There are many different stitching techniques for darning. Like quilting the benefits of tailoring, crocheting, knitting, darning are priceless."
Another came from Carole who said that invisible darning services (ie where the darning is such that the mend looks just like new) is available at the dry cleaners in the USA. So if you can't find the time to do it, there's always the dry cleaners.
Light Bulbs and Curtain Pole Ends
The make do and mend spirit is definitely alive!
A few readers wrote about their darning eggs and mushrooms (vintage too!) while others mentioned using light bulbs and even the wooden finial of a curtain pole to help them in mending; basically anything with a smooth round surface will do the trick. This is Gail's darning egg passed onto her by her mother-in-law.
A Mended Bedsheet
Michelle shared her darning work on her bedsheet, which I thought was lovely because I would not have thought about mending such an item. I usually end up chopping it up and upcycling it into something else. She said,
"The sheet is cotton flannel and the thread is just cotton sewing tread. I used and embroidery hoop and straight pins to hold the cloth in place, hand stitched a border around the tear, made long "warp" thread stitches, then wove the whole thing into a tidy little solution. Nothing fancy."
Mended Pair of Shorts
Cleavan was very happy to have picked up darning and she told me she has been mending her partner's shorts eversince. She has even been doing a little invisible mending; just look at how invisible it is! Cleavan says she forgot to take a picture when she started so the red lines are how far the tear went. She darned the edges first because they were a lighter part of the plaid pattern using grey thread, before switching to black thread for the black middle section. I think it is a lovely job, don't you?
Sometimes garments will need a second mend. I was wondering if I would ever get tired of my black jacket, but no, I haven't. It's one of my favourites because (if you have heard me talk about it), it's the one where I burnt it on the collar. It was one of those moments when the fabric gets damaged from an iron that's too hot. I had originally added flowers from a scarf and appliqued them onto the jacket. Now the patches are starting to fray. I decided to keep the patches but overlay them with free motion embroidery. Initially, I wasn't sure whether I wanted to do a satin stitch or a straight stitch. It became and experiment, trial and error on scraps first and then finally trying out both on the jacket. Problems did arise with the tension and so you can see that sometimes the bottom thread shows up at the top. Tension is my number one enemy! Well, free motion embroidery requires a lot of patience, so never do it if you are in a rush or feeling annoyed. Once you get the tension right and you have practiced on a piece of scrap, the stitching is a breeze.
It gets very exciting when my friends want to repair or at least have their garments repaired for them. At last Saturday's talk and upcycling workshop, many of the participants were already keen menders and hungry for more techniques to make repairs look cool!
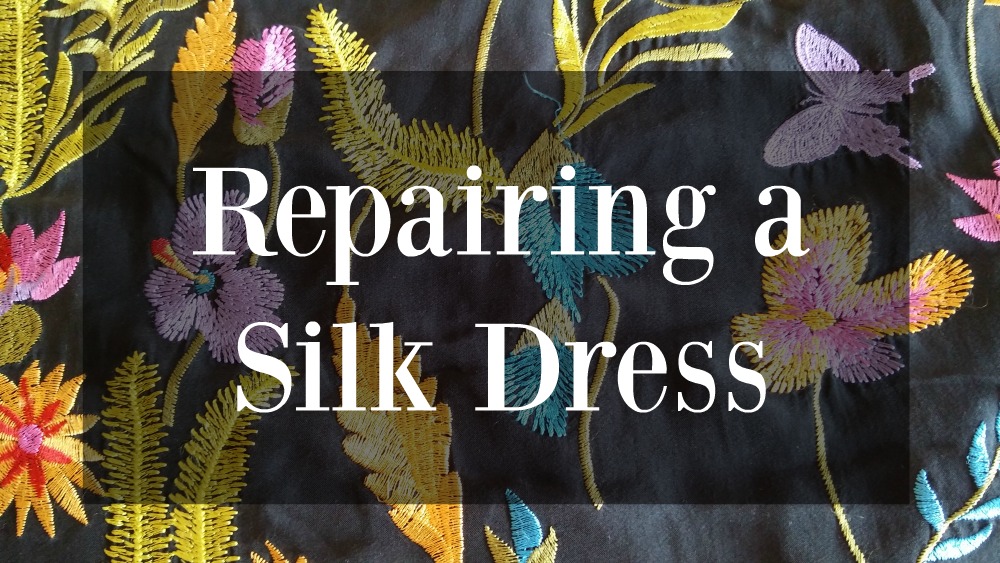
I'm always on the look out too; it's all part of the #slowclothing mantra that I had discovered last year, and a silk dress was what got me curious about free motion embroidery as a repair technique. I have never used or sewn silk textiles before. They seem too delicate to handle and even putting a needle through it makes me think I'm damaging it. That is until my friend asked me to repair her black dress. It's a Chloe dress mind you and has lovely embroidered flowers running along the bottom half of it. The torn areas were under the arms and I really couldn't get my head around this one.
Was I going to use visible mending or invisible mending? And even if I wanted to make it invisible, how was it even possible with a fabric like silk?
I decided to go for quasi-visible/invisible mending - is there even such a term? The plan was to make the mend complement the beautiful embroidery, either through hand embroidery or using free motion embroidery. In the end the latter won the day and I used black DMC machine embroidery thread. Tear away embroidery stabiliser was used to ensure the silk would not get crumpled up and sucked into the sewing machine. To make things a tad easier to handle (because I do want to be in control of my sewing) I used an embroidery hoop as well. It might seem over the top but this is S-I-L-K!!!
Free Motion Embroidery
You will need a darning foot and to lower the dog feeds (please read the instructions to your sewing machine as it may differ between machines). If you don't have the darning foot or have never tried free motion embroidery then it is better to use the normal foot, keep the dog feeds up and sew as you would normally. The whole idea is to cover up the torn areas with as many stitches as possible to reinforce the torn area.
I decided that the stitches would look like the original embroidered patterns on the dress - I did my best and ended up with some leaves on covering up the tears. The tear away stabiliser helped a lot because it kept the stitching in place and I didn't have to worry about causing further damage to the silk.
Almost Invisible!
Can you see the mend? The exposure of the second picture has been increased slightly so that you can see the black leaves.
My friend, CL, had popped over to the UK to attend a conference in April and casually asked, "Would you like anything?" I was thinking of very nice teas and their buttery cakes, and of course Jaffa cakes. So when she got back, I was pleasantly surprised (okay, I was OVER the moon) when I received the Make do and Mend booklet that I had seen circulating in the British mending space.
Even though it's a reproduction, it does give some insights as to how people lived during the 1940s and how the war saw the introduction of not just food rationing but clothing rations as well. Almost everything was diverted to the war effort.
Just how much of this is part of our lifestyle? Very close to zero! Some of the tips in this little booklet actually echo what my mother taught me. Things like, how to store your clothes properly, getting rid of moths, putting newspaper into wet shoes and my all time favourite - NEVER hang dry a knit. I learnt my lesson dearly when I didn't listen!
Refashion or upcycle was never part of the lingua franca but they definitely knew what they had to do to add a bit of spunk to their wardrobe. This section on "Turn out and Renovate" definitely shows us the endless possibilities of what could be done to get a "new" wardrobe; they even had a section on underwear. I was surprised that there wasn't anything on Men's refashioning though, but before you say that men do not sew, EVERYONE was encouraged to pick up sewing skills as part of the war effort as you can see from this little snippet from the Imperial War Museum website.
And can you believe that clothes swaps existed even then?
"Clothing exchanges were set up by the Women's Voluntary Service (WVS) to help meet the needs of parents struggling to clothe their growing children. Parents could take the clothes that their children had outgrown and were given a number of points for the clothes handed in. These could be 'spent' on other clothes at the exchange. "
And what about in Singapore? Just like in war torn Europe, war compelled the public to do what was necessary to make new clothes from old, and mend worn garments: read the story behind the sewing machine now displayed at the National Art Museum. But mending was very much part of every culture even before the war. In Singapore, we had "sew sew" women who would visit households on a regular basis just patch up some clothes or fix a button that was falling off. I found some images here and here.
"Grandma was a “sew-sew” woman, skilled in 手红handicrafts, sewing, mending with threads and needles. She plied her mending skills at the boats anchored at the docks and outer waters of Singapore. "
I wonder what happened to the the "sew sew" women after the war?
I found this old Singtel phonecard on sale on the internet, and it shows a sew-sew woman at work (sorry for the extremely pixelated image).
Why can't it be stylish to be mending? Let's bring mending back in vogue. I'm now on my second mend of my jean shorts, and if you are keen to know more about mending, just hop on over to my Fix It Friday series.
Did you know it's Mend it May on Jen Gale's My Make Do and Mend Life? She's got some pretty nifty resources too! And if you are in London, lucky you! You're in for a right treat if you visit the Imperial War Museum. They have an on-going exhibition called Fashion on the Ration, detailing how men and women styled themselves during the war. It's on until May 2017, so catch it while you can.
I was going to share how to re-line a bag today but because it is taking such a long time (and frustration!) I have decided to share that with you next Friday! So remember to tune in next week. Instead, I'm going to share two great tools that I discovered. My repair journey has been pretty exciting so far, but I've come to realise that you can't rely on your good old sewing machine or basic needle and thread to get the job done. Here are the specialist tools I have found on the internet, and would like to purchase (or make!). Note, although I've said "specialist", I think these will make a great addition to your sewing kit!
Speedweve Darner / Darn Easy
It's touted as the smallest weaving loom ever, but it is ever so useful in helping you with your darning! If you have ever darned your clothes, you will have probably squinted and cursed at how hard it is to weave between the warp strands. With the Speed Weve, the metal prongs lift and lower the alternating warp strands so that you can feed your needle in between them - no more eye strain, and you get extremely neat darning!
Image: Wondertrading
I would really love to get one of these but because they are no longer in production many of the ones on the market are from the 40s and 50s - scream, VINTAGE! If you're wondering how to operate one, pop over to darning expert, Tom of Holland, where he does a good job explaining the mechanics behind the machine.
Sewing Awl
This great tool is capable of going through thick textiles that your sewing machine is unable to, and it also takes away the need for painful hand sewing. The sewing awl comes with sturdy sharp needles, a bobbin and waxed thread. This video shows you how it's all done. It may look slow, but you will have strong stitches once the sewing has been done.
What garment repair tools have you come across and have found useful?
Image at top courtesy: http://www.thechandleryonline.com/
Mending can be boring, especially when you try to get your kid to do it.
To be honest, I don't know of any child or teenager who loves to sew.
I spent last Thursday trying to convince a group of secondary school kids that sewing is a useful skill. I think they didn't realise how long the process would take, and that needlework does require practice. But at the end of the day they did appreciate it.
When I was trying to get my kid to repair his shorts, I realised it had to be a fun process, or he wouldn't do it at all. There's no point in forcing something when they don't think it's fun - I think it applies to everything too!
Mend Together
We were changing the elastic of my son's two pairs of shorts together. It was fun because we were doing it TOGETHER and he was learning from what I was doing to his shorts. Mend & Compete
My son suggested that we see who took the fastest to insert the new piece of elastic into the wasit of the shorts. That was fun, and we definitely had a lot of giggles.
Mend with Friends
I think the best part of mending is if you can mend with your friends. It becomes more than just mending; it's about building friendships and sharing ideas!
Mend as a Community
Then why not become part of a mending community? Look out for repair sessions in your community, make new friends and learn new repair techniques! In Singapore, we have Repair Kopitiam!
A hole in my trousers? And yes, the hole was on my bottom and big enough to see my undies.
This can definitely be fixed with some DIY - repair it with a darning needle and embroidery thread and you are good to go! So, I stopped myself from buying a new pair of trousers!
If you don't have matching thread, that doesn't matter. Sew on your darning with a thread that has colours complementary to the fabric. I think I've given my trousers a boho look!
Want to know how to DIY? Check out my tutorial below.