Have you noticed how moody people have been getting lately? Tempers flare if you accidentally bump into someone, feelings get cooped up inside until it boils over, and looking at how fast-paced our lives have become, others don't seem to take notice what's going through the minds of their loved ones. When was the last time you checked on your friends, or parents for that matter? I don't mean via whatsapp or email, I mean call them or be their physically for them. That's really sad, but I suppose it comes hand-in-hand with the economic growth that our country aspires to have.

Heart Beat Headband Sensor
I read that the heartbeat could be a measure of someone's emotional state. Obviously, it's more complex than the rate of a heartbeat but it's a start! Becky Stern did a similar project but she made her own LED heart. Here's my version with optical fibre filaments and an old tie, but you could use the same technique on any garment.
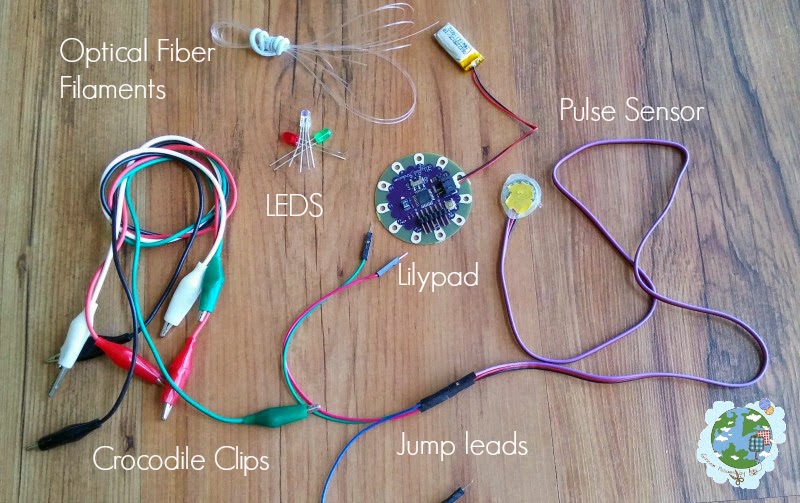
Materials and Tools


Step 1 Prepare the Pulse Sensor
Prepare your Pulse Sensor according to the instructions in the box. This is very important because the electronic bits are exposed and you don't want to get them damaged along the way.
Step 2 Design
Where do you want to put your Pulse Sensor? I decided that the end of the tie would be the best place to put it as a) it would be accessible and b) it was wide enough to hide the wires and the sensor. I tested out the sensor with a single LED, attached it to the LilyPad with crocodile clips and uploaded up an existing heartbeat programme.
Where do you want to put the filaments? Tie the tie round your head to see where the filaments should go.

Step 3 Reinforce the Tie
As I was using an old silk tie, I was worried about it getting damaged. I ironed on the thinnest interfacing (aka fusible web) I could find to the underside of the silk.

Step 4 Solder Pulse Sensor to LilyPad
Don't forget to strip the wires first. If you want to keep the Pulse Sensor intact, attach jump wires and strip them instead! As you can see, my soldering needs a lot of improvement - I actually forgot the soldering wax :-)

Step 5 Sew on LED
Now my favourite part! Sew on LED pin and optical fiber filaments. I used a couch stitch to secure them - don't go all the way through with your stitches though.

I found that it can be made even sturdier by adding 3D fabric paint / puffy paint. It does wonders! Just make sure it dries thoroughly before you continue.

Step 6 More Decorating!
I sewed on beads to the ends of the filaments. This idea was shared with me during my Galaxy T-shirt workshop. Can you imagine if they were crystals? Let's just say it's a stroke of genius!

Step 7 More Soldering!
I realised that my LED was heating up really quickly once I turned on the LilyPad. The folks at the Prototyping Lab advised I needed to add resistors. I had to work with tiny ones and then solder up wires directly to the LED.
 |
| Hidayah and electronics expert Joo Khai helping me out. |
 |
| Close up of the connections between the LilyPad and the LED |
Step 8 Hook Up and Wear It!


The LED blinks according to your heart beat.
What's next?
I now need to get the LED to change colour so that there are different colours with each emotion. It's going to be difficult because it's more coding! Stay tuned.


I love this! Hubby has been promising to code up a motion sensor set for me to stitch into something. Maybe in a few years he'll get around to it.
ReplyDeleteOooh, motion sensor. I've used that in one of my earlier projects. Stella, you can get a lot of the arduino code online as it's open source. It's just a matter of piecing them all together. You can do it!
DeleteWow what a creative idea!
ReplyDeleteThank you, Valerie. Appreciate you popping over!
DeleteGreat idea! Thanks for sharing :)
ReplyDeleteThank you for your sweet comment.
DeleteThis is such a neat idea, and pretty too!
ReplyDeleteThank you. The tie is extremely old and I love the vintage feel too it.
DeleteWow, that's very creative!
ReplyDeleteThank you, Julia!
DeleteWow, how cool is that? This is so neat, thanks for sharing!
ReplyDeletetesting comments from IE not logged in - cheers from Stella
ReplyDeleteThat is such an adorable idea, you're so creative! Great job.
ReplyDeleteThis is incredible! I wish I had someone around with tech skill, or some time to learn any coding at all. I love this headband do much
ReplyDeleteVery creative and amazing how you did that with the lighting. You are so talented! Your headband should definitely put a smile on someone's day! Very cheery!
ReplyDeleteThis is very creative!
ReplyDeleteWow! This is very creative and a great idea! You are very talented! Keep up the great work :)
ReplyDelete