-->
no
no
Showing posts with label wearable technology. Show all posts

Interactive Textiles

2 comments
Interactive Textiles
Things come together in the strangest ways!
One of my maker friends, Leon, was talking to me about how cool it would be to make an interactive display panel with animation and moving objects for Maker Faire.  I thought it would be a great idea too, but then what would be the narrative? You can't just expect whirring objects to attract people, you needed to have an objective behind it.  We didn't have the idea until we were having dinner with our friend Mel - she blurted "Hey, you could have it be part of  Fashion Revolution Day".  We were very excited and overwhelmed at the same time as we needed to quickly form a team to cover the electronics, design and animation as well as textile integration.  Fortunately, Leon was very happy to implement the projection mapping and integrate it with the electronics (capacitive touch sensing), I was keen on the textile integration, and we managed to get students of the School of Digital Media and Infocomm Technology, Singapore Polytechnic to assist with the design and animation. Everything fell into place.  Two months later, this is what we have!

interactive textiles

The whole concept of the interactive was to inform viewers of what their sustainable fashion choices are - a corresponding animation would be played. The students were great and came up with a great design and accompanying animation (very hipster, I might add!). We are now onto the final stages and I am integrating the textiles into the design, and we still have to combine it with the electronics. Sneak peak of the animation is on my IG! Come down to take a look at it on the 24th April 4 - 7pm at the Hub Impact Singapore, 128 Prinsep Street. More details here.


Going Back to Geeky

No comments
I haven't been dabbling with electronics for a while. Wait, actually for more than half a year!
I was working on my heartbeat headband and got stuck with some coding..... and then I got caught up with other things.
Do you feel that can happen sometimes?
I do, projects start and then you get stuck and lose inspiration. After a period of time you get a reboot when the right time comes!

The right time came when I had the opportunity to collaborate with Fazli and Luther of 12Geeks. We talked, we dithered a bit, we brainstormed, and then we decided to hold a workshop!
I wanted to get the participants to create something useful, but in the end I realised what came naturally to me, wouldn't for others  - it might have been a little too ambitious (see video of project) but the participants pulled through with their version of the pouch!


In the end I had fun, but it's nice to go back to something that I had put down for a while. Thank you to 12Geeks!

Spot the geeks!

Trying out their sewn circuit before they made their pouches.

How To Make Your Clothes Glow With Elastolite

4 comments
How To Make Your Clothes Glow With Elastolite

So when Iron Man was in the cinemas, a few people came up with great Iron Man tutorials. I had a friend who wanted me to make one too.
I wasn't too keen. I would also need to carry around this big battery and inverter.
That is until I found Elastolite on Sparkfun.
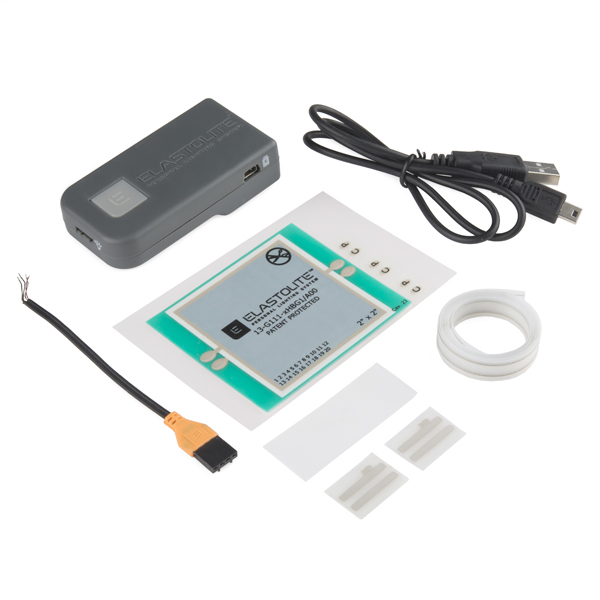
ELastoLite Kit - 2x2 Inch - Green
Image: Sparkfun
It's Flexible & Iron On!
I was really excited about it as it is flexible - you can scrunch it up and it won't break or tear. And because it is flexible, you can incorporate it into to your clothing. The other plus is the circuit is adjustable (snip, snip!) and is iron on.

Good Online Instructions
The instructions were very straight forward - you just need this video , a good pair of hands and an iron! Remember to watch the video first before you start anything - this is IMPORTANT because all the little pieces are quite fiddly and once you iron there's no undoing it! If you are not sure, watch the video again until you get it.


What I Did
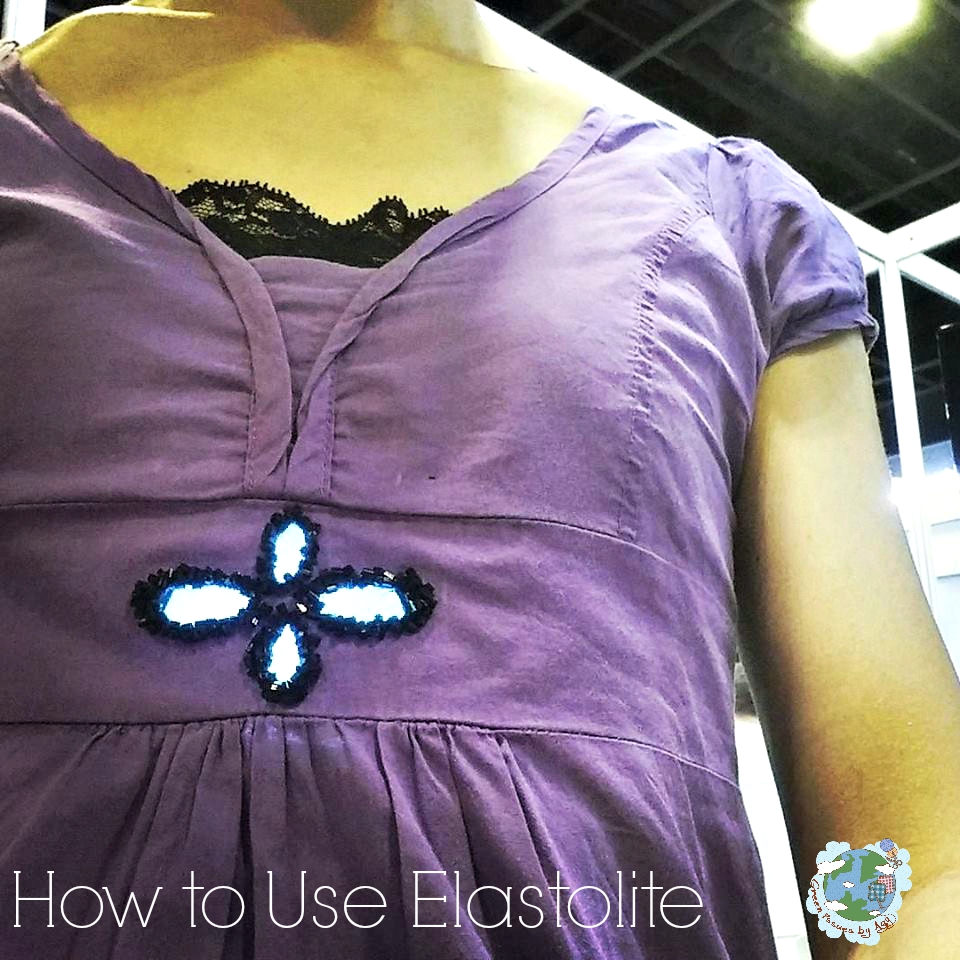
I took one of my old tops from work and decided to cut a few holes at the bust area. I then added interface and then proceeded to bead the area.


Why Did I Choose the Bust Area?
That's the most stable area in the garment, especially when the sash is tied towards the back.
The stability allows me to embed the elastolite onto the garment.  I decided not to sew the elastolite onto my top, as that would mean losing its waterproof properties and also I wouldn't be able to use it in another garment. Instead I made a mini insert out of felt that I could stick onto the underside of the garment with velcro.


I also ironed the circuit to felt to provide extra stability. You could iron it to the original garment if you like!

Pocket for the Battery
The ideal location for the battery is in a pocket. I sewed one for my garment and had it placed along the inner right seam.

I quite like how the elastolite makes my clothing different, plus I've designed the whole thing so that I can take it out and wear something else underneath. The battery lasts around 9 hours so having it on the whole evening is no problem. If it's off then you will have a "white patch".

Have you tried elastolite before? Share your tips here!


Wearing My Heart on My Sleeve (Part 1)

17 comments
Have you noticed how moody people have been getting lately? Tempers flare if you accidentally bump into someone, feelings get cooped up inside until it boils over, and looking at how fast-paced our lives have become, others don't seem to take notice what's going through the minds of their loved ones.  When was the last time you checked on your friends, or parents for that matter? I don't mean via whatsapp or email, I mean call them or be their physically for them. That's really sad, but I suppose it comes hand-in-hand with the economic growth that our country aspires to have. 


Heart Beat Headband Sensor
I read that the heartbeat could be a measure of someone's emotional state. Obviously, it's more complex than the rate of a heartbeat but it's a start! Becky Stern did a similar project but she made her own LED heart.  Here's my version with optical fibre filaments and an old tie, but you could use the same technique on any garment.


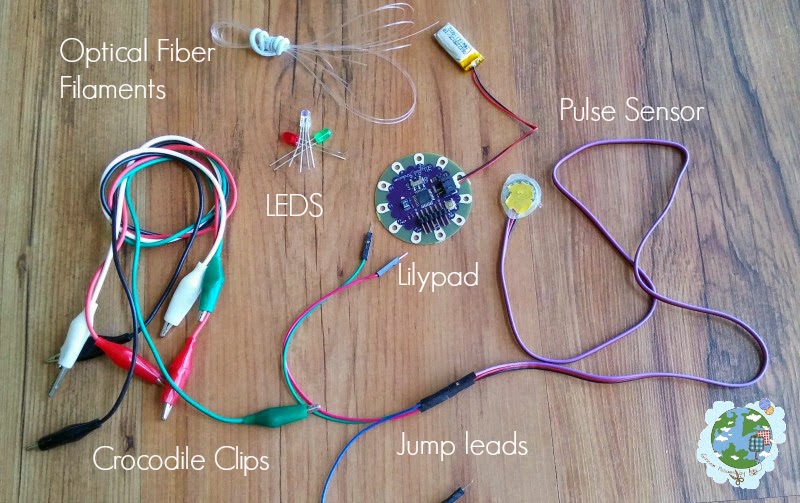
Materials and Tools


Step 1 Prepare the Pulse Sensor

Prepare your Pulse Sensor according to the instructions in the box. This is very important because the electronic bits are exposed and you don't want to get them damaged along the way. 

Step 2 Design

Where do you want to put your Pulse Sensor? I decided that the end of the tie would be the best place to put it as a) it would be accessible and b) it was wide enough to hide the wires and the sensor. I tested out the sensor with a single LED,  attached it to the LilyPad with crocodile clips and uploaded up an existing heartbeat programme. 

Where do you want to put the filaments?  Tie the tie round your head to see where the filaments should go.


Step 3 Reinforce the Tie

As I was using an old silk tie, I was worried about it getting damaged. I ironed on the thinnest interfacing (aka fusible web) I could find to the underside of the silk.


Step 4 Solder Pulse Sensor to LilyPad

Don't forget to strip the wires first. If you want to keep the Pulse Sensor intact, attach jump wires and strip them instead!  As you can see, my soldering needs a lot of improvement  - I actually forgot the soldering wax :-)


Step 5 Sew on LED

Now my favourite part! Sew on LED pin and optical fiber filaments. I used a couch stitch to secure them - don't go all the way through with your stitches though.


I found that it can be made even sturdier by adding 3D fabric paint / puffy paint. It does wonders! Just make sure it dries thoroughly before you continue.


Step 6 More Decorating!

I sewed on beads to the ends of the filaments. This idea was shared with me during my Galaxy T-shirt workshop. Can you imagine if they were crystals? Let's just say it's a stroke of genius!


Step 7 More Soldering!

I realised that my LED was heating up really quickly once I turned on the LilyPad. The folks at the Prototyping Lab advised I needed to add resistors. I had to work with tiny ones and then solder up wires directly to the LED.  

Hidayah and electronics expert Joo Khai helping me out.

Close up of the connections between the LilyPad and the LED

Step 8 Hook Up and Wear It!


The LED blinks according to your heart beat.

What's next?

I now need to get the LED to change colour so that there are different colours with each emotion. It's going to be difficult because it's more coding! Stay tuned.

Wearable Objects with Technology

No comments

Did you know that materials expert, Christ Lefteri will be speaking in Singapore? I can't wait to hear him share his thoughts on materials and trends on wearables! I'm so excited to be part of this collaboration between IDA Labs, One Maker Group and Materials Design Lab. I'll be there to teach you how to get connected with your garments - literally! We will be going through basic Arduino on the lilypad and looking at the various possibilities.

Sign up for a weekend of making and fun! http://peatix.com/event/76417

Here are the photos of the session. We had a good turn out, with the participants making a child safety necklace, fire alert brooch, modular LED light and a ladies handphone holder. 


Child Safety Necklace Prototype 


You're Sew Electric!

3 comments
You're Sew Electric!
I'm really excited - woo hoo! I contributed this article to Make Magazine - a combination of upcycling, electronics and little embroidery. If you are thinking of making a Valentine's gift and want to impress your partner with your making skills, this might be the DIY for you!  Pop over to Make Magazine and take a look. Happy Valentine's Day!


Featured in Make Magazine

Living Leonardos : Makers@Art Science Museum

2 comments

The ArtScience Museum's latest exhibit is the 'Da Vinci: Shaping the Future', which celebrates the life and works of Da Vinci.  The ASM is also one of the anchor venues for the Singapore Maker Festival 2014 which celebrates the Maker movement in Singapore. It "advocates hands-on learning, promotes ‘do-it-yourself’ activities and celebrates the talents and inventiveness of local makers". Pop over to ASM from today onwards and join us for some making at the Living Leonardos: Makers @ ArtScience Museum. I will be there to share the Sew Da Vinci / Fabric Hacking with Leon Lim on 13 December from 1 - 7pm. 

Update:

Here are a few photos that I managed to take during the event. We were pretty busy!


Teaching the Disadvantaged - 4 Things I Learnt

No comments
My cousin is intellectually disabled. He has a mind of a 5 year old, but physically he's almost sixty. Yet, a stranger will stare and think ill of him even though my cousin means no harm. In fact, he can do a lot more than just smile and giggle - he understands what is going on around him, he interprets emotions, and he does a good job folding pieces of paper. 

I was reminded of my cousin firstly, when I had the opportunity to teach a group of 12 year old kids at Chaoyang School (a special education school), and secondly when I witnessed the skills of the students of Tanglin School (another special education school) yesterday afternoon at IDA, Singapore. 


This is what I learnt:

1. They are no different from you and me
It might be stating the obvious, but sometimes we forget! In fact they are very curious; I wonder whether it is because they are more visual learners than we are. The Chaoyang children were given a tour of IDALabs and the OneMaker Group workspaces at National Design Centre, and they were intrigued by the prototyping that could be done. I liked how they had ideas of their own - one kid wanted to make a magnet and I think he's coming back to do it!

2. Praise their efforts
A little confidence boost goes a long way even if it is for what might seem to be a small thing to you!


3. Be very patient AND forgiving
The intellectually disabled take a little longer to learn, but they will get it in the end. Sometimes, you have to adjust your workshop so that their needs are met. For example, one child had poor motor skills and had trouble with tying knots. What have I learnt from this? I should have been more prepared so that another technique could be used. 

4. Be prepared for surprises
Never underestimate them. In fact, at the Chaoyang workshop, some of the kids were able to sew electronic circuits onto their bags without much help, while the Tanglin students (16 year olds) managed to tackle the 3D printer and design their own 3D printed products! 

Have you worked with the disadvantaged? What are your tips? 


LED Dancing Dress

4 comments

That's what my husband calls my latest upcycle, a dancing dress, and I think it's because I've incorporated the LED lights into it. I wore it to a friend's barbeque and I got a lot of queries along the lines of  "Why is your dress glowing?". Many had to do a double take!


I was inspired by Becky Stern's Sparkle Skirt (see video below). Her skirt had laser-cut motifs and underneath she had programmed some LEDs to sparkle away depending on how you moved. Personally, I felt the sparkle was too much for me, and I wanted to mute it with the fabric of a dress that I had. 


I didn't use Adafruit, but LilyPad Arduino together with the accelerometer and rows of LEDs. These were sewn onto an old slip, which means I can transfer it to another outfit easily! This is one way of giving an old outfit some pizazz! 


It took me one evening and night to design, sew and programme it. I had some difficulties at first as the connections were loose and that was in part due to the slip being extremely billowy.


Here it is worn under a colourful dress that I have. As you can see, the colours of the dress mutes the sparkles of the LEDs and there is a glowing effect.   What do you think?


LilyPad Arduino Interactive Pad

1 comment


Now that I have a bit more time, I've been doing a bit more of the LilyPad Arduino. I thought it would be a good idea to have an interactive pad that would show my workshop participants what you could achieve with the different sensors and outputs of the LilyPad.  Kenneth Larsen came up with this LilyPad Arduino sensor mat , and I thought it would be great if I could come up with my own.  

I used conductive thread and all the sensors and outputs of the Protosnap LilyPad Development Board.   Here's a video of the interactive in action. Unfortunately, the vibration of the vibe board isn't clear, but if you look closely, you can see it vibrate.

What do you think?


This was featured on 

no
no